Probably the most important skill for any woodworker is joinery. Attaching pieces of wood to each other is required on most any project and if it needs to withstand any kind of load you need a good strong joint. There have been lots of joinery techniques through the centuries, but modern techniques (together with modern glue) allow you to make stronger joints than every before.
Modern glues are really strong, but you need a lot of surface area for a strong joint, which is why techniques like mortise and tenon are so popular – lots of surface area on both sides of the tenon for the glue to hold onto. But I tried making one once, using a drill and chisel for the mortise and it ended up looking sloppy and was too loose. There are tools which make the process easier, but they are really expensive.
I’ve searched around and have found a couple of techniques which have worked well in a variety of projects. They’re very repeatable and while you have to invest in good tools to do them, they’re not that expensive and they use tools you’ll want to have around the shop anyway.
A word about glue
The purpose of most joinery techniques is to create enough surface area for glue to adhere and produce a strong joint. So choice of glue is very important. There are plenty of articles on the web comparing different kinds of glue. The one here was the most interesting to me. I found that a normal carpenter’s glue, like Titebond works well, cleans up easy and is reasonably priced. I’ve tried Titebond III, but it’s waterproof and I found that if it gets on any exposed surface you’ll see spots when you put on varnish. So I use it for outdoor projects, but I stick with Titebond I for everything else. I’ve heard good things about Gorilla Glue for woodworking, so I’ll probably try it someday. But for now Titebond is it for me.
Dowels
My first joint of choice is dowels. They require simple tools (a drill and doweling jig) and if you use enough dowels can produce a joint as strong as mortise and tenon. I use these when maximum strength is need, like in table legs.

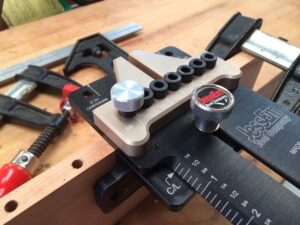
The trick with dowel joints is repeatability. You need the exact same spacing in both pieces or things won’t fit right. There are many jigs on the market that let you get the right spacing, at various price points. They all have fixed spacing for the dowels, but many only let you have a fixed distance from the edge of the board. To change that you need to use shims and that leads to inaccuracy. So I went with the Jessem Doweling Jig because it variable edge spacing with detents so you can get nice repeatable results. It also has hardened steel guide bushings so it will (hopefully) last through lots of doweling jobs.
If you buy this or any jig, make sure to get a really big bag of dowels. You go through them pretty fast. The only downside to this jig is the fact that it doesn’t have a built-in clamp. So you have to use a wood clamp, which makes it a bit hard to line up just right. If I could do it over, I might have opted for the DowelMax, but it was much more expensive and harder to setup precisely.
The Jessem uses 3/8″ dowels, which are typically 2″ long. This is good for most jobs. They also make a 1/4″ add-on for smaller jobs and 1/2″ when you really need a lot of holding power. They have videos and instructions on how to do many kinds of joints. It’s been working great for me.
Biscuits

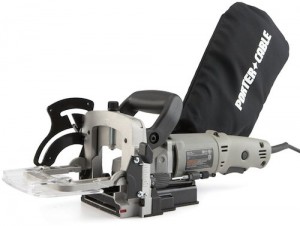
If you’ve ever watched The New Yankee Workshop you know that Norm Abrams loves biscuit joinery. This is a technique which requires a single purpose tool. But I find that I do biscuit joints so much that it’s well worth the investment. I found a great comparison of popular models. From this I settled on the Porter Cable 557. It has a great fence which gives very repeatable results, has plenty of adjustments for biscuit size and positioning, and is reasonably priced on Amazon. Plus it comes with a nice case to keep it in. Make sure you buy plenty of biscuits, you’ll go through them fast. I went with a big bag that has a variety of sizes.
I use biscuits both to join wood edge-to-edge for table tops and for edge joints that don’t need as much structural strength as, say, a table leg. For instance, I used them for the slats in my oak Library Table.
Drawer Joints

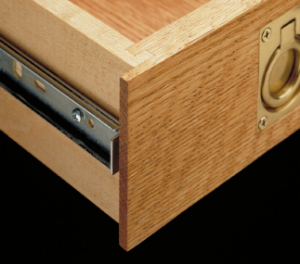
Building drawers has always scared me. The precision of dovetail joints and the complexity of the jigs required to get repeatable results feels beyond my abilities. But the great thing about the internet is that it can show you all kinds if alternatives with videos to make it look like something you could actually do. My favorite so far is the Locking Rabbet Joint. I used this on the drawer for my library table and it worked great. The drawer is strong and straight and looks pretty cool when you have the drawer open.

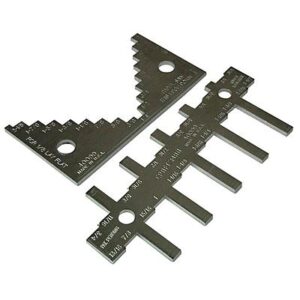
I have a router table, but for the joints I did I used a table saw like it shows in the article. You just need to make sure the saw height is right. I have this nice little tool for this which is basically a piece of aluminum with various marked height steps. It is inexpensive and even comes with a companion router height gauge. You can get it at Amazon.
Once you have the height you want (I always make a pass on some scrap wood to make sure), you need to make the appropriate slits in the wood as shown in the article. When attaching, I used small brads in addition to glue for extra strength. But some people would say that’s overkill. With this type of joint, you need a façade on the front of the drawer, an extra piece of wood to cover up the joints. But for my drawer, I needed a façade that was a bit wider than the drawer to hide the slider anyway.
The Rest
There are many other types of joints and I’m sure I’ll try some of them in the future. But for now, these joints make me feel like I could build anything!
Leave a Reply